Small businesses can no longer afford to lag when it comes to setting up DMARC or other email security features. Why? The vast majority of business phishing attacks came from email in 2023. Moreover, Google has now made DMARC mandatory for marketers.
Think of DMARC as the label for handling instructions on the packages you usually get in the mail. It tells email providers the appropriate level of ‘care’ with which to ‘handle’ your emails en route to your inbox.
Now, I admit DMARC can be quite a mouthful to call out loud, let alone remember – especially if you’re not an email deliverability specialist or email marketer. However, bear with me and I’ll show you exactly what DMARC is, how it works, and how to set up your first DMARC record.
Let’s start with the basics and build up to the ‘how to’ for a complete understanding.
Table of Contents
What is DMARC and How Does it Work?
DMARC stands for Domain-based Message Authentication, Reporting, and Conformance. Simply speaking, it is a set of rules that help email providers identify suspicious (phishing) and malware emails and prevent them from reaching your inbox.
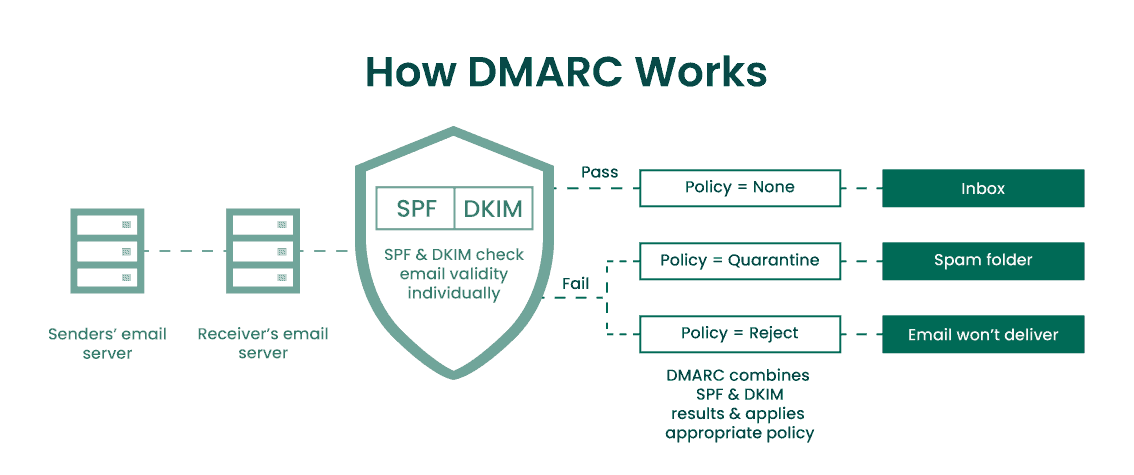
DMARC tells the email provider what to do if a message fails verification. DMARC works with two other security protocols – SPF and DKIM – which check if the email sender did send the email in question. If there’s a mismatch, DMARC takes over and decides whether to quarantine, reject or accept the message.
Here’s a quick example: Let’s say you email a subscriber with a Gmail account. When the email arrives, Gmail will check for your DMARC information, which is in the email header. If the information matches, the email gets the all-clear and goes to the inbox.
If there’s a mismatch, the DMARC record will be checked to decide how the email will be processed. DMARC kicks in after SPF and DKIM checks are completed. SPF checks if that particular email address is authorized to send emails on behalf of your website (domain), and DKIM checks if the email’s content is intact.
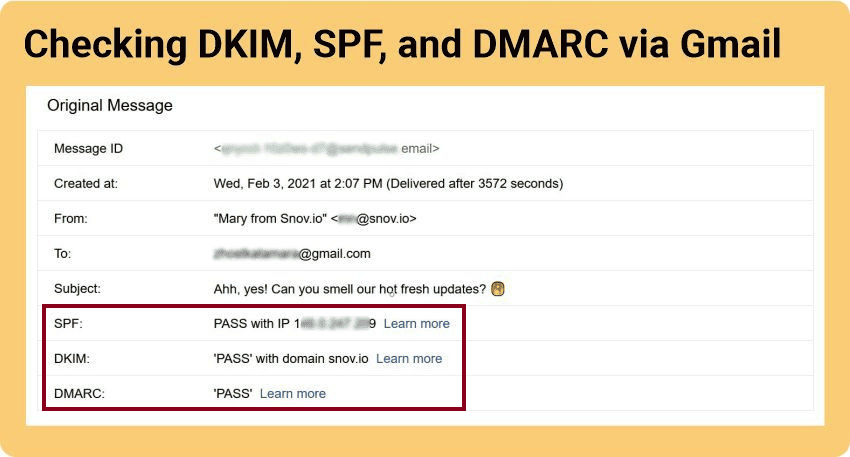
Gmail will then send you a message telling you whether the email passed or failed verification.

What Does a DMARC Record Look Like?
Here’s an example of a hypothetical DMARC record:
v=DMARC1; p=reject; rua=mailto:[email protected]; ruf=mailto:[email protected]; fo=1; aspf=s; adkim=s;
As you can see, it has many different elements. Let’s take a look at what each element stands for:
V=DMARC1: This indicates the version of the DMARC record. In this case, it’s Version 1
p=reject: P relates to the policy for processing failed emails. Here, the policy says that all emails failing DMARC verification are to be rejected.
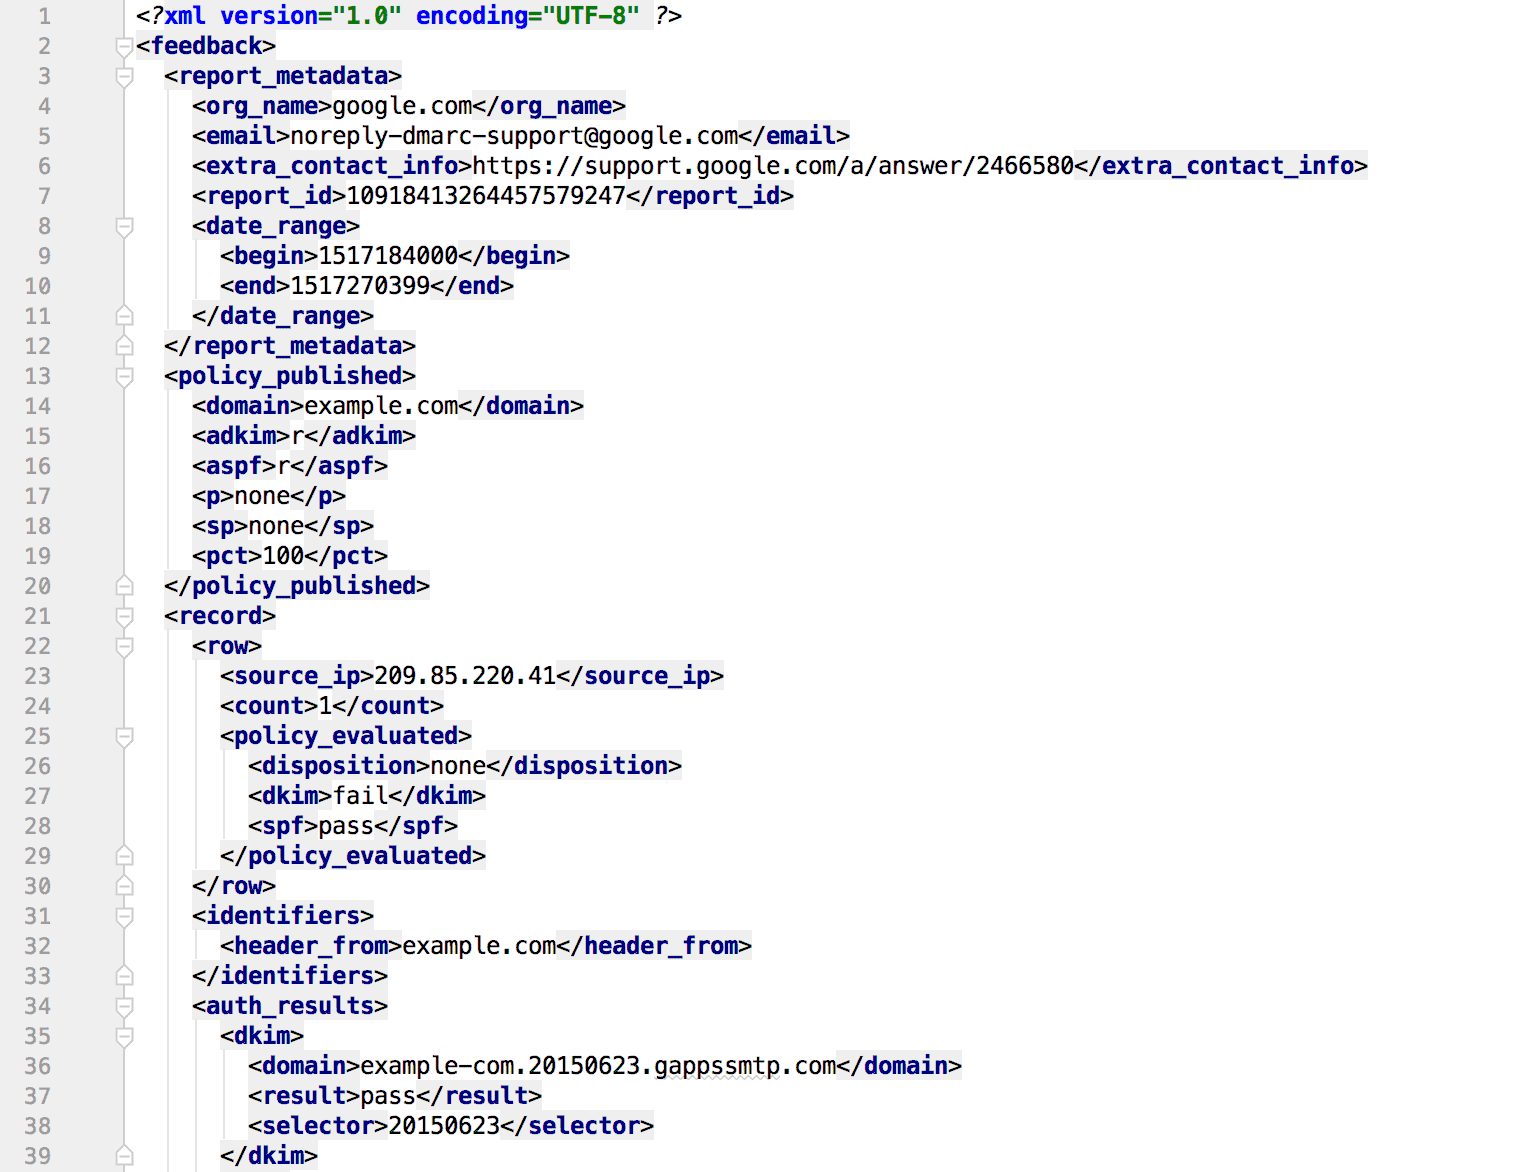
Rua=mailto:[email protected]: Let’s say you send an email campaign to your list. You can specify an email address for the receiver (Gmail in the earlier example) to send pass or fail DMARC reports every 24 hours. This data can help the sender identify and fix deliverability issues. This is where you’d find that email address.
Ruf=mailto: [email protected]: If you want status reports on every email, you can specify a separate email address. In this example, that email address is ‘dmarc-forensics’.
Aspf: This stands for Authoritative Sender Policy Framework. It tells the receiving server how strictly the domain given in the email header must align with the one used in the SPF check. The Aspf field can have one of three values:
S – strict alignment
R – relaxed alignment
Blank – relaxed alignment
For example, if the value was Aspf=s, then authentication would be passed only if there was an exact match between the two domains.
Email marketing tools like EngageBay generate consolidated reports to give you a complete picture of email deliverability across campaigns.
Email Authentication 101: Cover Your Bases Against Phishing Attacks
Why Set Up DMARC?
If DMARC is not set up, you could be vulnerable to many risks in the short and long term. In fact, companies sending over 5,000 email messages through Gmail must adopt DMARC to comply with updated authentication standards. Setting up your DMARC helps you with the following.
1. Enhances email deliverability
Setting up DMARC provides transparency about how many emails are being sent from your domain, who’s sending them, and who they are being sent to. If you have a low deliverability rate, analyzing DMARC reports can help you get to the root causes. This means you can quickly resolve those issues and increase your reach.
2. Improves sender reputation
Email service providers like Google are cracking down on phishing and spam in a big way. If you send marketing emails in large volumes, you’d naturally be on their radar. DMARC can help you comply with changing security standards and improve your sender reputation over time.
3. Build trust with your audience
If your emails were spoofed, it could take a long time to rebuild trust with your subscribers. DMARC helps you identify and report spoofing attempts. This protects your brand reputation and shows subscribers that you take their security seriously.
Email Deliverability: 7 Tips To Get More Clicks, Sells & Signups
How To Check if Your DMARC is Set Up Already?
Let’s go back to the example above. Here are the steps you can use to check if DMARC is set up.
1. Check your DMARC reports
If you have an existing domain, you can send a test email to a different domain. Check the email header to find out if the SPF, DKIM, and DMARC fields show ‘pass’ or fail’. This will indicate whether the records are set up and working as they should.

2. Look up the DNS records
Think of DNS as an internet equivalent of Yelp or any other business directory. It helps emails find the recipient on the internet. To access the DNS records for a particular sender, use the command ‘dig _dmarc.domain txt‘.
On hitting enter, you should see a TXT record that looks somewhat like the example we discussed above. The domain is ‘example’.
3. Check the DMARC policy field
If DMARC is enabled, the policy field should read ‘v=DMARC1’. Most importantly, check the value set for the ‘p’ field. It should either be ‘none’, ‘quarantine’, or ‘reject’.
4. Check the DMARC policy settings
Next, analyze the other fields next to the ‘v’ tag to understand how the other settings have been configured. For example, look at the email addresses where the reports are to be sent (‘rua’ and ‘ruf’) as well as the SPF and DKIM settings (‘aspf’) and (‘adkim’).
You can also use an online tool to check if DMARC is set up and working properly.
SPF, DKIM, DMARC: Guide to Email Authentication Protocols
How To Set Up DMARC Record
If you don’t see an existing DMARC record, you’ll need to set one up. Here’s the step-by-step process.
1. Preparing for DMARC setup
Make sure you have SPF and DKIM up and running before DMARC. This is because receiving servers will validate SPF, DKIM, and DMARC in that order. If you set up DMARC first, your emails may get flagged for phishing or spam. Also, you need to set up SPF and DKIM for every domain you may use.
So, if you have multiple domains, ensure the three elements are correctly aligned with each other.
2. Set up DMARC – only mailbox
If you send emails from multiple domains and want authentication reports for every email, your inbox could be swamped within a matter of days. That is why you must have a separate mailbox for DMARC reports.

3. Make a list of all authorized domains
Creating a list of authorized domains can help you spot suspicious IP addresses from the DMARC reports. This can save you time and effort.
4. Decide DMARC policy
If you’re setting up DMARC for the first time, you’ll need to decide how strict a policy to implement. If it’s a new domain, start with a ‘none’ policy. This means all your emails would be delivered to the recipient’s inbox. This should give you plenty of data and progressively optimize your policy.
Your final goal should be implementing a ‘reject’ policy as it improves your sender reputation and protects your audience.
Read also: Everything You Need to Know About Email Subdomains
5. Setting up DMARC record
Here are the steps to adding a DMARC record.
1. Login to DNS
Login to your DNS account with your hosting provider and create a new record. The three key elements here are host/name, record type, and value. Make sure you choose the right domain.
2. Create a TXT record
Next, navigate to the ‘create record’ field. The field name could vary from provider to provider. If you see a drop-down menu, select the TXT (text) option.
3. Add the DMARC record
Let’s refer back to the DMARC example above. Based on this record, you can see that the value for:
‘v’ is v=DMARC1
‘p’ can either be p=none, p=quarantine or p=reject, depending on the policy you selected.
In ‘rua’ The ‘a’ stands for aggregate. This field should have the email address to which the aggregate DMARC reports should be sent.
In ‘ruf’, the ‘f’ stands for forensic. Specify an email address to which you want all your forensic reports sent. The reports allow you to trace the path of every email to its destination.
4. Save and publish the record
Your DMARC record is complete. Save the record and give it around 48 hours for validation. You can then send a test email from the domain to check if the header information shows the correct configuration. Alternatively, you can also use various online tools to verify if the DMARC record is correct.
5. Check DMARC reports
Make sure you monitor DMARC reports regularly to fix any authentication issues.
The Impact of Email Blacklists, Greylists, and Whitelists
Best Practices for Setting up DMARC
Email security is not a one-and-done deal. You need a process to optimize DMARC over time. Here are a few tips and recommendations.
1. Take it one step at a time
Start with a ‘p=none’ policy to establish a baseline for emails failing authentication. This will help you identify authorized senders and fix any DMARC issues before moving on to stricter policies. Keep a log of all the issues you encounter and move to the next level only when they have been resolved completely.
2. Update your authentication policy regularly
Setting your policy to ‘reject’ can impact legitimate emails. The key is to find a good balance between deliverability and security. Not all factors affecting deliverability may be within your control.
For example, changes to privacy regulations may require you to update your authentication policy at short notice. If you add new email servers, you may also have to adjust DMARC settings in the warm-up phase. The key is to plan for every possible scenario and create effective SOPs for your team to follow.
ISP and Email Deliverability: How To Hit The Inbox Always
Conclusion
For small businesses, DMARC is the last line of defense against phishing and spam attacks. Setting up DMARC and adopting an effective policy can take some time. However, it can deliver compliance benefits that are well worth it. It can do wonders for your email marketing ROI and customer experience as well.
Get started on your DMARC journey today!
FAQ
1. How long does it take to set up DMARC?
The time it takes to set up DMARC depends on the level of detail you want to put into your DMARC policy and the overall DNS configuration. It takes about 1-2 hours to identify your authorized email senders and the best DMARC policy alignment. Expect to spend another 2 hours or so creating DNS records, with another 1-2 days for testing.
2. How do I get DMARC compliant?
In January 2024, Google updated its email authentication requirements for high-volume senders. Setting up DMARC is mandatory. If you send marketing emails, you must:
- Implement SPF and DKIM for email authentication.
- Set up a DMARC policy.
- Align the domain in the “From” header with SPF or DKIM.
- Update DNS records for all approved sending domains or IPs.
- Provide a one-click unsubscribe link in every email you send.

Great blog! I’ve been looking for ways to protect my business from phishing attacks. Setting up DMARC sounds like a crucial step, but I’m not sure where to start. Any tips or resources you recommend for beginners?
https://biteblueprint.com